
Definition:
Microsoft Word is a graphical word processing program that users can type with.
The main purpose of word is to allow users to type and save the documents. It is a
word processing software in the Microsoft Office suite.
The main purpose of word is to allow users to type and save the documents. It is a
word processing software in the Microsoft Office suite.
How to open word?
There are two ways to open word.
a) Open Run Command >> type "winword" >> MS Word will be opened.

b) Go to Start >> Programs >> Microsoft Office >> Word >> Word will be opened.

Figure: Opening Word through Run command
b) Go to Start >> Programs >> Microsoft Office >> Word >> Word will be opened.
Figure: Opening word through Start Button
After Launch Word Looks Like...

Figure: After Opening Word
Then click on blank document the document shows,

Figure: Blank Document
File Menu:
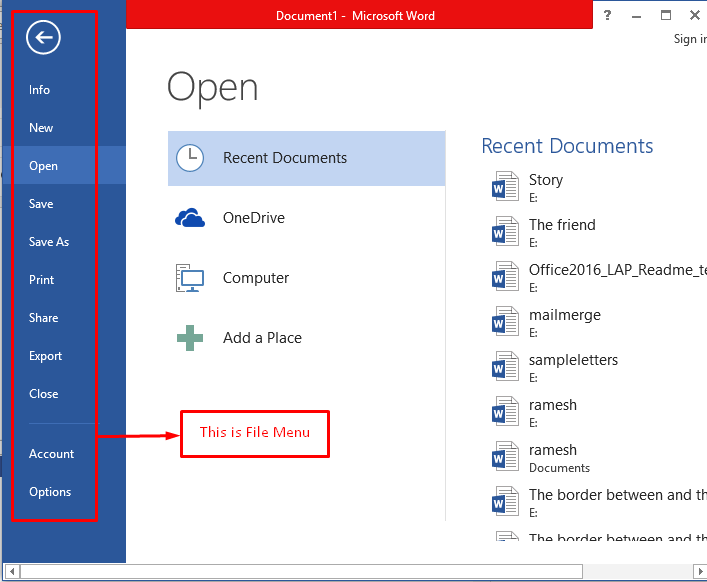
Figure: File Menu
Info:

Figure: Info about the document

Figure: Protect document

Figure: Mark as Final

Figure: Mark as Final Confirmation

Figure: How to encrypt your document

Figure: Encrypting document

Figure: Inspect document

Figure: Recover Previous Versions of the document
New:

Figure: New Document
Open:

Figure: Open recent documents
Save:

Figure: How to save the document
Save As:

Figure: Save as the document
Print:

Figure: How to print the document
Share:

Figure: How to share the document
Export:

Figure: How to export the document
Close:

Figure: How to close the working document
Account:

Figure: Sign in account to Microsoft
Options:

Figure: How to get into Word Options

Figure: Word Options
The document contains some ribbons as HOME, INSERT, DESIGN, PAGE
LAYOUT, REFERENCES, MAILINGS, REVIEW and VIEW on the top.
LAYOUT, REFERENCES, MAILINGS, REVIEW and VIEW on the top.

Figure: Ribbons or tabs
1. HOME Ribbon:
There are some toolbar's available under each ribbon
1.1. Clipboard Toolbar:
There are some commands available under each toolbar.
Clipboard contains paste, copy, cut and format painter commands.
Clipboard contains paste, copy, cut and format painter commands.
If we want to copy or cut some text then selected text will be copied into
clipboard.
clipboard.
For example,

Figure: Clipboard toolbar
About Format Painter:
1. Select the text or graphic that has the following that you want to copy.
2. On the Home tag, click on Format Painter..;
3. Use the brush to paint over a selection of text or graphics to apply the formatting...
4. To stop formatting, press ESC.
2. On the Home tag, click on Format Painter..;
3. Use the brush to paint over a selection of text or graphics to apply the formatting...
4. To stop formatting, press ESC.
1.2. Font Toolbar:
When we move mouse over the pin button of the font toolbar then, we can see

List of commands that are available under font toolbar
1. Font Type
2. Font Size
3. Font Bold
4. Font Italic
5. Font Underline
6. Font Strikethrough
7. Subscript
8. Superscript
9. Text Effects and Typography
10. Text Highlight color
11. Font color
12. Change case
13. Increase Font size button
14. Decrease Font size button
15. Clear all formatting

Figure: Font Toolbar
1. Font Type
2. Font Size
3. Font Bold
4. Font Italic
5. Font Underline
6. Font Strikethrough
7. Subscript
8. Superscript
9. Text Effects and Typography
10. Text Highlight color
11. Font color
12. Change case
13. Increase Font size button
14. Decrease Font size button
15. Clear all formatting
Figure: Font Commands applied in all ways
1.3. Paragraph Toolbar:
a. Bullet Library:
Different kinds of bullet formatting styles

Figure: Various kinds of bullet formatting styles

Figure: Bullet Format Applied
b. Numbering Library:

Figure: Numbering format
c. List Library:

Figure: List Format
d. Align Left:

Figure: Left Alignment
e. Align Center:

Figure: Center Alignment
f. Align Right:

Figure: Right Alignment
g. Justify:

Figure: Justified Alignment
h. Decrease Indent of paragraph:

Figure: Indent Decreased for paragraph 1
i. Increase Indent of a paragraph:

Figure: Indent Increased for paragraph 1
j. Line and Paragraph Spacing:

Figure: Line spacing adjusted for 2.0 pt
k. Shading:

Figure: Shading applied for paragraph 1
l. Borders:

Figure: All Borders applied for paragraph 1
There are different types of border types available

Figure: Different Kinds of Borders
m. Sort:
The given paragraph will be sorted in alphabetical way either in ascending order
or descending order.
or descending order.

Figure: Sorting in ascending or descending order
n. Show Indicator where we are writing:

Figure: Writing Indicator
1.4. Styles Toolbar:
There are different types of style commands available and listed below.

Figure: Showing different kinds of styles
for example, if we apply some style named "Intense Quote" then the format looks
like...
like...

Figure: Intense Quote Style applied for paragraph 1
1.5. Editing Toolbar:
In editing toolbar we have the following commands,
1. Find
2. Replace
3. Select
2. Replace
3. Select
1.5.1. Find:

Figure: Find Something from the document
Suppose if we are finding "India" from the document then, we need to click on
Find button and type "India" in the right side of navigation. then the document
shows...
Find button and type "India" in the right side of navigation. then the document
shows...

Figure: Displaying results while finding in document
By clicking Ctrl+F also, you can find the navigation window.
1.5.1.a. Advanced Find:

Figure: Find Advanced from the document
After clicking Advanced Find... button you can see this...

Figure: Finding Advanced in document
After clicking on Find Next button, you will see the highlighted word in
document as...
document as...

Figure: Result showing from the document
Similarly, while going on clicking the Find Next button, it will show the
respective results and it shows the window like...
respective results and it shows the window like...

Figure: After searching completed
1.5.1.b. Go To:

Figure: Go To...
After Clicking Go To.. button you will get this window...

Figure: Go To Line Number 2
Then the cursor will be placed on line number 2

Figure: Cursor moved to 2nd line
1.5.2. Replace:

Figure: Replace button
After clicking the Replace button, you will get the window like...

Figure: Replacing with a new word
After Replacing...

Figure: After replacing a word
1.5.3. Select:

Figure: Select Button

Figure: After selecting all from the document
2. INSERT Ribbon:
There are some toolbar's available under this ribbon listed below
1. Pages
2. Tables
3. Illustrations
4. Add-ins
5. Media
6. Links
7. Comments
8. Header and Footer
9. Text
10. Symbols
2.1.a. Cover Page
2.1.b. Blank Page
2.1.c. Page Break
1. Pages
2. Tables
3. Illustrations
4. Add-ins
5. Media
6. Links
7. Comments
8. Header and Footer
9. Text
10. Symbols
2.1. Pages:
Pages toolbar contains 3 commands
2.1.a. Cover Page
2.1.b. Blank Page
2.1.c. Page Break
2.1.a. Cover Page:

Figure: Opening some built in cover pages
If we apply the "Banded" cover page then the page looks like...

Figure: "Banded" Built-in cover page applied
2.1.b. Blank Page:
If we want to insert a blank page in between the two pages or after two pages
or after last page then we can insert as follows...
or after last page then we can insert as follows...

Figure: How to add blank page

Figure: Blank page added and cursor moved to next page
2.1.c. Page Break:
In Page break, if we are writing second paragraph in first page. Then eventually,
we want to move that second paragraph to the second page so, we place the
cursor at starting point of second paragraph and press on Page Break button or
use Ctrl+Enter as Short Key.
The Screen shots were shown clearly below...
we want to move that second paragraph to the second page so, we place the
cursor at starting point of second paragraph and press on Page Break button or
use Ctrl+Enter as Short Key.
The Screen shots were shown clearly below...

Figure: Before Page Break
While clicking on Page Break button or Ctrl+Enter, the page looks as...

Figure: While Clicking on Page Break Button
After clicking on page break button, the change will be as follows...

Figure: After Page Break
2.2. Tables:
To insert tables, we do as follows...

Figure: How to add a table

Figure: Adding table and excel spreadsheet

Figure: Applying Table Styles and borders to the tables
2.3. Illustrations:
There are some commands available in this toolbar listed below.
2.3.a. Pictures
2.3.b. Online Pictures
2.3.c. Shapes
2.3.d. Smart Art Graphic
2.3.e. Add a chart
2.3.f. Take a screen shot
2.3.a. Pictures:
You can insert the pictures directly from your PC by clicking on pictures...

After clicking on Pictures command, a window will show as...

After Insertion of image, the page looks like...

Figure: How to add a picture from PC
Figure: Browsing for a picture to insert in a page
Figure: After insertion of image and how to make adjustments
2.3.b. Online Pictures:
You can directly browse pictures from online too...

Figure: Search for Online pictures
after clicking the Online Pictures button, you can see the following window

Figure: Browsing Online Pictures
then you can choose a picture and insert into the page.

Figure: After insertion of image from Online pictures
2.3.c. Shapes:
To draw a shape

Figure: How to draw a shape in a page
Different types of shapes available, whatever shape you need as per user
requirement you can take from that
requirement you can take from that

Figure: showing all types of shapes
2.3.d. Smart Art:

Figure: How to add a smart art

Figure: Choosing the SmartArt Graphic

Figure: After inserting a smart art
2.3.e. Adding a chart:

Figure: How to add a chart to the page

Figure: Selecting the different kinds of charts

Figure: Showing chart based on required details
2.3.f. Adding a Screenshot:

Figure: How to take screenshot
After adding screenshot

Figure: After adding a screenshot
2.4. Media:
2.4.1. Add-ins:

Figure: Add-in to word
If we want to add some app like Wikipedia from store then, we can add and use

Figure: Click on My Apps

Figure: Adding Wikipedia App to the word
Now you will appear this window,

Figure: Wikipedia app added to the word
Now you just select the word from the document then, it automatically shows from
Wikipedia app

Figure: Results from Wikipedia app
2.5. Media:
2.5.1. Online Video:

Figure: Adding Online video to the document

Figure: Inserting video from Online

Figure: Inserting based on your requirement
2.6. Links:
2.6.1. Hyperlink:

Figure: Adding Hyperlink to page

Figure: Browsing for Hyperlink
2.6.2. Bookmark:

Figure: Inserting a bookmark

Figure: Adding the bookmark for selected text or graphic

Figure: Giving bookmark name
Now go to Page Number 1 and press Ctrl+G

Figure: Searching for bookmark

Figure: Bookmark Results
2.6.3. Cross - reference:

Figure: Knowing Cross reference command

Figure: Inserting cross reference

Figure: Cross reference
2.7. Comments:

Figure: Comment command

Figure: Adding comments
2.8. Header and Footer:
2.8.1. Header:

Figure: How to add header to pages

Figure: Built-in headers

Figure: Header section
2.8.2.Footer:

Figure: Built in Footers

Figure: Footer section
2.8.3. Page Number:

Figure: Page Number

Figure: Different types of formats to add page numbers
2.9. Text:
2.9.1. Text Box:

Figure: How to add Text Box to a page

Figure: Adding Text Box to a document
2.9.2. Quick Parts:

Figure: Quick Parts Command
2.9.3. WordArt:

Figure: WordArt command

Figure: Built-in WordArt's

Figure: Way to apply WordArt
2.9.4. Signature:

Figure: How to add signature

Figure: Adding Signature to the document

Figure: After adding signature
2.9.5. Date and Time:

Figure: How to add Date and Time to the document

Figure: Date and Time added to the document
2.9.6. Object:

Figure: How to insert an object to the document

Figure: After insertion of an object
2.10. Symbols:

Figure: How to add symbols to the document
2.10.1. Equation:

Figure: How to add equations to the table

Figure: After adding equation to the page
2.10.2. Symbols:

Figure: How to add symbols to a page

Figure: After adding a symbol to a page
3. Design Ribbon:
3.1. Themes:

Figure: How to apply themes to the document

Figure: After applying Ion Theme to the document
3.2. Document Formatting:

Figure: Different types of Document's Style sets

Figure: Various colors applying to the document style

Figure: Various fonts to the document style

Figure: Paragraph Spacing to the document style

Figure: Set as default for all the documents
3.3. Page Background:
3.3.1. Watermark:

Figure: How to add watermark to a page

Figure: Watermark applied to all pages of the document
3.3.2. Page Color:

Figure: Applying Page Background Color

Figure: How to apply Page Borders to the document

Figure: Selecting style for a page border

Figure: After applying page borders to the document
4. Page Layout Ribbon:
4.1. Page Setup Tool Bar:
4.1.1. Margins:

Figure: How to adjust page margins for the document

Figure: Built-in Margins available to apply

Figure: Before applying margins to a page

Figure: After applying Built-in Margin - "Narrow"
4.1.2. Orientation:

Figure: To Change page orientation

Figure: Portrait orientation

Figure: Landscape Orientation
4.1.3. Size:

Figure: How to Adjust Page Size

Figure: Various Kinds of Pages Listed
4.1.4. Columns:

Figure: How to add or remove multiple columns

Figure: Adding two columns..

Figure: Splitted into two columns...

Figure: How to add more columns

Splitting columns into three

Figure: Splitted into 3 columns...
4.1.5. Insert Page and Section Breaks:

Figure: Insert new page or section break

Figure: Different types of page break options

Figure: Page break option

Figure: After New Page insertion
4.1.6. Line Numbers:

Figure: How to add line numbers

Figure: Adding line numbers in various forms

Figure: After adding line numbers to the document
4.1.7. Hyphenation:

Figure: How to change hyphenation in document

Figure: Change Hyphenation for million

Figure: Applying Automatic Hyphenation to the document
4.2. Paragraph:
4.2.1. Left Indent Adjustments:

Figure: Left indent adjustment for a paragraph

Figure: Left indent for a paragraph point by point
4.2.2. Right Indent Adjustments:

Figure: Right Indent Adjustments for a paragraph
4.2.3. Spacing before a paragraph:

Figure: How to add spacing before a paragraph
The change will be as follows - spacing before a paragraph
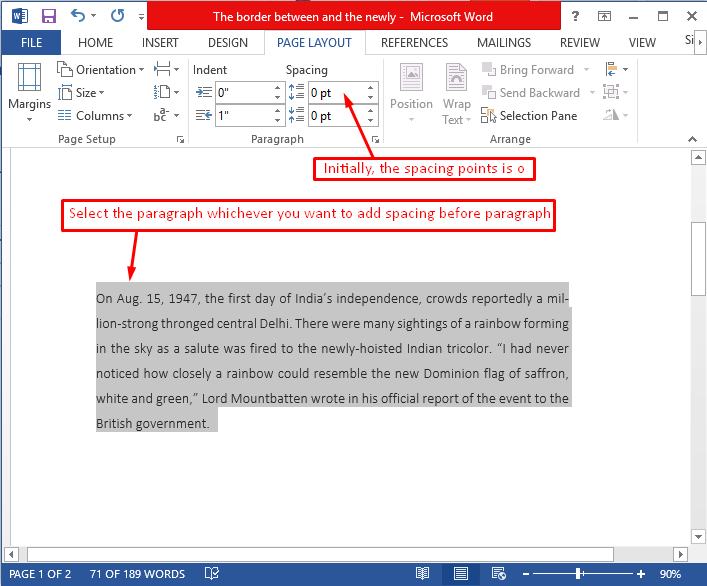
Figure: Before adding spaces to the paragraph

Figure: After applying spacing to the paragraph
4.2.4. Spacing after paragraph:

Figure: Spacing after a paragraph
4.3. Arrange:
4.3.1. Selection Pane:

Figure: Selection Pane of objects

Figure: Selection Pane showing objects list
5. References Ribbon:
5.1. Table of Contents:

Figure: How to add table of contents to the document

Figure: Document showing page number 1

Figure: Document showing page number 2

Figure: Document showing page number 3

Figure: Adding table of contents to the document

Figure: Table of contents added to the document

Figure: After adding additional data to the document
Now we can update the table of contents as follows

Figure: Update table of contents

Figure: Asking to update entire table

Figure: After updating table of contents
5.2. Footnotes:

Figure: How to insert footnote to the document

Figure: After inserting a Footnote to the document

Figure: How to add Endnote to the document

Figure: After adding Endnote to the document
5.3. Citations and Bibliography:

Figure: How to insert citation to the document

Figure: Click on Add New Source command

Figure: Fill the details of the Author

Figure: Author details will display on the document

Figure: How to add bibliography to the document

Figure: List of built-in Bibliograpy

Figure: After adding Bibliography to the document
5.4. Captions:

Figure: How to add caption to the images or tables or equation
Let us add some images to the document

Figure: Adding Image 1 to the document

Figure: Adding Image 2 to the document
Now add caption to the images,

Figure: Adding caption to the image 1

Figure: Caption added
5.5. Index:

Figure: How to mark entry the text in a page

Figure: Selecting some text to mark entry

Figure: Click Mark to mark entry the word "landscapes'

Figure: 'landscapes' marked as entry
5.6. Table of Authorities:

Figure: Mark Citation some text from document

Figure: Select some text for mark citation

Figure: Make short citation for selected text

Figure: Selecting another part of text and make short citation
Similarly, do the same for some part of text and make short citation

Figure: Table of Authorities in a page

Figure: To insert table of authorities to a page

Figure: Click OK to insert Table of Authorities

Figure: Table of Authorities List
6. Mailings Ribbon:

Figure: Start Mail Merge

Figure: Step-by-Step Mail Merge Process

Figure: Select Letters and click on Next

Figure: Step 2 Mail Merge Wizard

Figure: Step 3 Mail Merge Wizard

Figure: Type New Address List

Figure: Customising Address List

Figure: Adding Address List

Figure: Save the Address List

Figure: Adding Mail Merge Recipients

Figure: Write your letter now

Figure: Add address block first in letter

Figure: Preview of address block

Figure: Adding date to the letter

Figure: How to add date to the letter

Figure: Selecting date format

Figure: Adding title to the letter

Figure: Type body of the letter

Figure: Preview letter

Figure: To complete merge click next

Figure: Edit individual letters

Figure: Merge to new document

Figure: Letters are ready
7. Review Ribbon:
7.1. Proofing:
7.1.1. Spelling and Grammar Check:

Figure: Spelling and Grammar Check

Figure: Related words in spelling to correct

Figure: erase spelling check

Figure: How to define dictionary

Figure: Sign in to Microsoft account and add dictionaries

Figure: Sign in Step

Figure: Thesaurus of some selected text

Figure: Finding thesaurus of a word

Figure: Word Count

Figure: Word count in the document
7.2. Language:

Figure: Changing language

Figure: Language Preferences

Figure: Setting Hindi Language to the word

Figure: Hindi is set to default

Figure: Restart Office to set Hindi

Figure: Office changed to Hindi Language
Figure: Translate one language to other

Figure: Translating document to Hindi
Figure: Translated to Hindi
7.3. Comments:

Figure: Inserting a new comment

Figure: Writing a new comment
7.4. Tracking:

Figure: Track of changes made to this document

Figure: Track changes in a document
7.5. Changes:

Figure: Accept changes to the document

Figure: Accepting changes to the document
7.6. Compare:

Figure: Comparing two documents

Figure: Simply comparing two documents

Figure: Select two documents and compare

Figure: Compare and combine two documents

Figure: Combining Original and revised documents
7.7. Protect:

Figure: Restrict Editing of the document

Figure: Restrict Editing options

Figure: How to start enforce protection

Figure: Protection method to the document

Figure: Document is protected now

Figure: How to stop protection to the document

Figure: Unprotect the document
8. View Ribbon:
8.1. Views:
8.1.1. Read Mode:

Figure: How to set the Read Mode of the document

Figure: Read Mode
8.1.2. Print Layout:

Figure: To know how your document looks after printing
8.1.3. Web Layout:

Figure: Web Layout View

Figure: Web Layout format
8.1.4. Outline:

Figure: Outline View

Figure: Outline view of the document
8.1.5. Draft:

Figure: Draft view

Figure: Draft view of the document
8.2. Show:
8.2.1. Ruler View:

Figure: How to show rulers to the document

Figure: Showing rulers in the document
8.2.2. Gridlines view:

Figure: How to show gridlines in the document

Figure: Gridlines view
8.2.3. Navigation Pane:

Figure: How to show navigation pane in the document

Figure: Showing navigation pane in the document
8.3. Zoom:

Figure: Zoom tool

Figure: Zooming options

Figure: Zoom in for one page

Figure: One page zoom
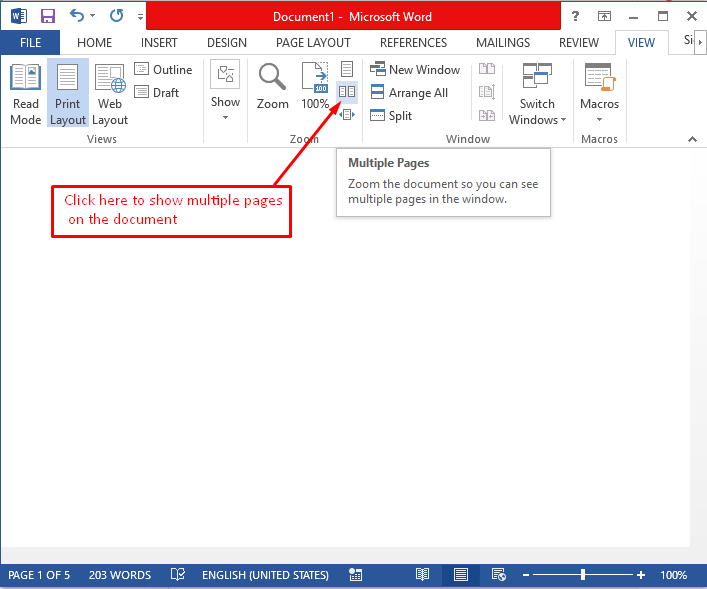
Figure: How to present multiple pages at a time

Figure: Showing multiple pages at a time
8.4. Windows:
8.4.1. New Window:

Figure: Adding new window with same content

Figure: New window added with same content
8.4.2. Arrange All:

Figure: Arranging all windows together to view

Figure: Arranging all windows together
8.4.3. Split:

Figure: How to split the window into two sections

Figure: After Splitting the window into two sections it is easy to edit
8.4.4. Switch Windows:
If we are working with two or more windows then we can switch to the window whatever we needed.
8.5. Macros:

Figure: How to create or view macros

Figure: Create new macro

Figure: Record macro

Figure: Macro button

Figure: Customising Macro

Figure: Recording macro

Figure: Stop recording macro

Figure: Click on View Macros
 Figure: Run Macro
Figure: Running Macro